# 前言
vue2的生命周期函数在实际工作中经常使用。我们也能清楚的知道他们的执行顺序是怎么样的。但是如果我们问到 父组件Father 和 子组件Child之间的生命周期函数的执行顺序是什么? 这时候会难倒很多小伙伴。
所谓实践出真知,我们就开始创建一对父子组件来进行验证
# 实践出真知
当前vue 版本 2.6.11
# 代码
Father.vue
<template>
  <div>
    <Child />
    <button @click="goDetail">跳转</button>
  </div>
</template>
<script>
import Child from './Child'
export default {
  name: 'Father',
  components: {
    Child
  },
  beforeCreate() {
    console.log('father beforeCreate')
  },
  created() {
    console.log('father created')
  },
  beforeMount() {
    console.log('father beforeMount')
  },
  mounted() {
    console.log('father mounted')
  },
  beforeUpdate() {
    console.log('father beforeUpdate')
  },
  updated() {
    console.log('father updated')
  },
  beforeDestroy() {
    console.log('father beforeDestroy')
  },
  destroyed() {
    console.log('father destroyed')
  },
  methods: {
    goDetail() {
      this.$router.push('/detail')
    }
  }
}
</script>
Child.vue
<template>
  <div>
    Child
  </div>
</template>
<script>
export default {
  name: 'Child',
  beforeCreate() {
    console.log('child beforeCreate')
  },
  created() {
    console.log('child created')
  },
  beforeMount() {
    console.log('child beforeMount')
  },
  mounted() {
    console.log('child mounted')
  },
  beforeUpdate() {
    console.log('child beforeUpdate')
  },
  updated() {
    console.log('child updated')
  },
  beforeDestroy() {
    console.log('child beforeDestroy')
  },
  destroyed() {
    console.log('child destroyed')
  }
}
</script>
# 分析
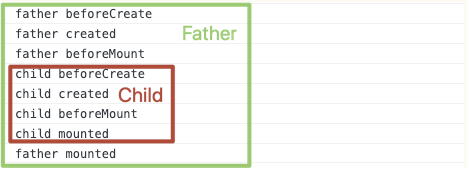
运行页面之后(页面创建和挂载),我们可以看见控制台打印如下
 由此我们可以得出结论:
在页面挂载阶段顺序是
- 先创建父组件的dom,然后父组件等待挂载
- 这时候再创建子组件的dom, 先挂载子组件
- 最后挂载父组件。
即先挂载子组件,再挂载父组件
# 组件销毁阶段
接下来研究组件的销毁阶段
首先在之前代码的基础上,我们得设置一个跳转页面的函数,这样就相当于销毁了他们父子俩, 上面的代码中应包含,跳转的路由请自行添加
这时候我们点击**跳转, **就会跳转到新的页面 /detail, 销毁了前面的Father和Child 组件。这时候我们来看看控制台的打印信息

由此我们可以得出结论: 在页面销毁阶段顺序是
- 先准备销毁父组件(beforeDestory)
- 销毁子组件
- 销毁父组件
即先销毁父组件再销毁子组件
# 结论
// 创建挂载时机
father beforeCreate
father created
father beforeMount
child beforeCreate
child created
child beforeMount
child mounted
father mounted

// 销毁时机
father beforeDestroy
child beforeDestroy
child destroyed
father destroyed
- 创建父组件
- 创建子组件
- 挂载子组件
- 挂载父组件
- 销毁子组件
- 销毁父组件
如有不妥,欢迎指出👏